For the most part, Apple have streamlined the upload procedure and integrated it into the Xcode IDE well (although, you MUST remember to download and install an Xcode plugin from the developer site, or the facility is mysteriously absent).

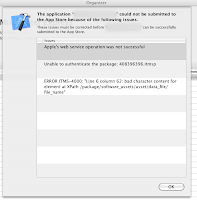
However the upload-to-iTunes-Connect procedure doesn't always work. In particular, it fails spectacularly (see the image) if your application name includes spaces.
Clearly, application names including spaces are Not The Right Way To Do Things. No one would want to do something like that. (No, we don't use applications like "Address Book" "DVD Player" "Front Row" or "Photo Booth". They'll never catch on.)
The worst part of the problem is that Xcode's upload error is completely cryptic. Rather than:
You tried to upload a binary whose bundle name contains a space.
you get something like:
Apple's web service operation was not successful.Unable to authenticate the package: 4084782348.itmspERROR ITMS-4000: "Line 6 column 62: bad character content for element at XPath /package/software_assets/assets/data_file/file_name"
Catchy, eh? User friendly, eh?
It's particularly galling as the "Validate..." step in the Xcode organiser window will not check for this problem, and tells you that your application is valid for upload. Sigh.
After discovering that there are problems with bundle names containing spaces, there are obvious things you could try:
- Rename the application without spaces. FAIL: No one wants to use an application called AddressBook.
- Fiddle the NSBundleName Info.plist entry so that it doesn't have a space in it, but leave the the "Application Name.app" filename as it was. FAIL 1: I don't think that this is a valid bundle any more. FAIL 2: It doesn't work. You still get the upload error.
- Scream, cry, whinge. FAIL: Whilst it doesn't actually make any technical difference, this will make you feel better for a short while.
There is a solution, though. And it turns out to be quite simple.
Rather than following the Apple instructions for uploading your app to iTunes Connect, perform the "Build and Archive" step. "Validate..." your application for luck. Then click on "Share..." and chose to save an image to your hard disk.
Now use Application Loader to upload the pkg image created to iTunes Connect.
It just works.

5 comments:
Thanks for this. For what it's worth, it continued to fail for me until I removed the space from the .pkg file that I saved on my hard drive.
I'm happy that I found this pretty early on, saved me a lot of headache. Thanks Pete
You, my friend, are a savior!
A perhaps more elegant way is to have a CFBundleName in your info.plist which doesn't contain spaces and to provide for a localized InfoPlist.strings file in your ressources group in XCode (even if your app only supports one language, the localized InfoPlist.strings file is provided for by default when you create a new project). Thenjust drop the following line into the InfoPlist.strings file:
"CFBundleName" = "My App with Spaces";
Now everything should work with Upload from inside the XCode Organizer.
Best,
Tim
PETE THANK YOU!!!
That saved me hours of work.
Post a Comment